Showing posts with label Hair Styles. Show all posts

Friday, April 16, 2010

AFRO PUFFS!

Need a quick hairstyle?! Well, here you go!

AFRO PUFFS!!!!!!!!!!!!!

STEP 1:Wash hair with JUST FOR ME Kids Conditioner and Shampoo!
Cost: $6.00 (with tax).  If you buy both $12.00

STEP 2:Let hair air dry.  NO HEAT PLEASE!
STEP 3: Moisturize scalp!
STEP 4: Part hair in 2 sections, straight down the middle!
STEP 5: Using pretty, adorable hair holders, put hair in 2 AFRO PUFFs (or buns).


STEP 6: We left some hair out in the back to make a 3rd AFRO PUFF!

SO CUTE!

Friday, January 8, 2010

More Braids!


I love doing braids on her hair because she does such a geat job of keeping them in. I'll have to film myself braiding next time so you can get an idea (if you don't already know how to braid).  Cornrows are great for boys too!! You can add beads (yes, even to a boy's head).  I'll show you later how to add beads the easy way!  And your child can help you bead, it makes the process go much faster!


Kinky Twists-BIG!

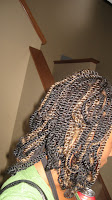
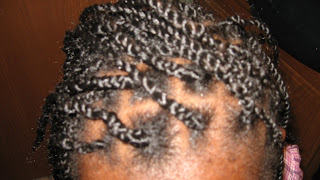
Kinky Twists are a popular hair style, with the use of extensions, in the African American community. The great thing about this style is that if maintained, it can last up to 2 months.  This is great news for parents  who don't want to do their child's hair everday.  It does not strain the hair and it serves as a protective style.  Best of all, it's easy to maintain! 

BUT, little girls do not like to sit for the 3-5 hours it can take.  So, for my nieces, I used bigger, boxed, kinky twists (again, using the Marly Braid hair posted earlier).

Later, I'll post a how-to-video (later meaning when I do them next!).  Take a look.

This is the beginning, on my head, done by myself.  Again, normally, the boxes are not boxed (random hair is just picked up so that it looks more natural.  The parts are WAY closer together, but I can't sit that long either and my arms get tired!). 

Now, all the twisting is done and I've boiled my water and I am beginning to dip them in the water.
 It really isn't scary, I'm just pretending!

 The Final Product!

Overall, I am pleased for it being my first time.


Now for the Girls!!


More Please!
Sometimes styles are trial and error on her because she has such an older face they make her look younger and throw the style off.  So, we're always experimenting to find the right, age-appropriate styles for her.  We're still learning.


Naturally, Beautiful (more on the outside than the inside sometimes)!


My little brother took this last picture.  Cool, huh?!  He talks about wanting to be a photographer someday!


Style with Extensions!

Here are a few more styles that I've done on the girls.  Their hair is washed using previous mentioned products!

1. Style # 1.  This is done with the use of curly extensions (found at ethnic hair store, price varies). 

                      BACK                         FRONT                      


I do not recommend hair exensions on small children, even older children.
 But we did  1/2 sew in (more to come later) and 1/2 crocheting (again, more to come later!). 
We wanted something fun for the first day back to school. 


Total Cost: $30.00
Total Time: 2 hours
Time Lasted: Week
 (only because she takes TERRIBLE care of her hair). 
Normally, this should last month-two months.


Tuesday, December 29, 2009

Cornrow Hair Styles!

Cornrowing is an art!  It can be a difficult, frustrating art.  It's great for me to have two heads to practice on.  I really enjoy learning new styles.  Here's another style done on my 9 year old niece.  Though I tried growing her perm out, her mother permed it while she was home.  So, the approach I take on her hair is different.
More to come on this later!
Hair Style # 1

Her hair is parted horizontally down the middle of her head.  I braided 3/4 of the front of her hair.  The remainder was left out and flat ironed (heat protectant applied). 

The back of her hair is braided vertically to the middle (where the front braids meet). 
When the front and back braids meet, I ponytail the remainder of the hair and put tons of curls in it.

This style, if maintained properly, can last 2-3 weeks.
DO NOT APPLY heat everday.  The curls should last a while if maintained and a scarf is worn!


Hair Style # 2


Again, her hair is parted in the middle and braided in the front. 

Shot from the side.


The back is curled and sprayed with hair spray and a shine gloss.


Length: Hair style can last from 2-3 weeks.
Again, do not apply heat everday and keep scalp moisturized.

Stylin'

As I was learning what products my hair needs, I was learning the art of hair and the many designs I could do with African American hair. Here are a few of the styles I have done on my nieces hair. Later, I'll provide you with steps on how to do some of these hairstyles.

Products: Children's hair is different than adult hair. Some products are made strictly for adults. However, I found the products from "I've Become a Product Junkie" Part 1 could be safely used on their hair also. HOWEVER, I only left in the 2 Minute Reconstructor on their hair for 2 minutes-NO LONGER!

Here is my precious 5 year old niece. She's now all natural! Here is a before shot of her (she's a bit tired!).


Step 1: Her hair is washed and conditioned.
Step 2: Her hair is parted into 5 rows 6-7 columns and pinned in place until ready to be braided. It's worth investing in hair ties and hair pins for this process!


Step 3: These squares are pretty big because she's so young and sitting for hours at a time is NO FUN!
Step 4: She has extensions in her hair. Below is the type of hair that I used.


Type of Hair: Marley Braid: $5-$7 per packet.  I used 1 1/2 on her hair.
Color: I used black.  However, there are SO many colors avaliable.  Choose the color closest to the hair.
Length: hair is extremely long.  Cut in half to double hair amount and you can still have the length
Store: Hair like this is usually only carried in ethnic hair stores.
Step 5: I take one square and the fake hair (as much fake hair as the square) and braid it (like you'd braid a braclet) just a little bit (braid each strand through 3 times).

Step 6: Once you have braided part of the hair, you will twist the remainder part of the hair, until it reaches the end of the extension.  (Notice: hair is braided to a little above her ear and the rest is twisted).
Step 7: If you use the correct hair, the ends will seal themselves. However, you still need to seal them. This can be done with heat. You can boil or microwave 6-8 cups of water. Then to seal the hair, dip the edges of the braid in the hot water.

CAUTION: Of course the water is hot! But the most important thing is to make sure you keep your child calm and their head as far away from the hot water as possible.

Step 8: Make sure to oil scalp (every few days to keep hair moisturized).
Step 9: This hair style can last a month, if not more.  If it's not properly maintained, it may only last 2 weeks.


The Final Result!
Time: 1 1/2-2 hours.


The Back!!!
Length: 5 inches below her shoulder.
Benefit: This style can be restyled in so many ways: pigtails, pony tails, buns, and pretty headbands