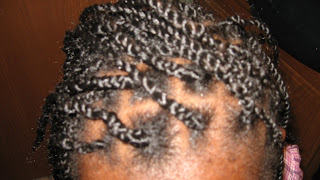
Products: Children's hair is different than adult hair. Some products are made strictly for adults. However, I found the products from "I've Become a Product Junkie" Part 1 could be safely used on their hair also. HOWEVER, I only left in the 2 Minute Reconstructor on their hair for 2 minutes-NO LONGER!
Here is my precious 5 year old niece. She's now all natural! Here is a before shot of her (she's a bit tired!).
Step 1: Her hair is washed and conditioned.
Step 2: Her hair is parted into 5 rows 6-7 columns and pinned in place until ready to be braided. It's worth investing in hair ties and hair pins for this process!
Step 3: These squares are pretty big because she's so young and sitting for hours at a time is NO FUN!
Step 4: She has extensions in her hair. Below is the type of hair that I used.
Type of Hair: Marley Braid: $5-$7 per packet. I used 1 1/2 on her hair.
Color: I used black. However, there are SO many colors avaliable. Choose the color closest to the hair.
Length: hair is extremely long. Cut in half to double hair amount and you can still have the length
Store: Hair like this is usually only carried in ethnic hair stores.
Step 5: I take one square and the fake hair (as much fake hair as the square) and braid it (like you'd braid a braclet) just a little bit (braid each strand through 3 times).
Step 6: Once you have braided part of the hair, you will twist the remainder part of the hair, until it reaches the end of the extension. (Notice: hair is braided to a little above her ear and the rest is twisted).
Step 7: If you use the correct hair, the ends will seal themselves. However, you still need to seal them. This can be done with heat. You can boil or microwave 6-8 cups of water. Then to seal the hair, dip the edges of the braid in the hot water.
CAUTION: Of course the water is hot! But the most important thing is to make sure you keep your child calm and their head as far away from the hot water as possible.
Step 8: Make sure to oil scalp (every few days to keep hair moisturized).
Step 9: This hair style can last a month, if not more. If it's not properly maintained, it may only last 2 weeks.
The Final Result!
Time: 1 1/2-2 hours.
The Back!!!
Length: 5 inches below her shoulder.
Benefit: This style can be restyled in so many ways: pigtails, pony tails, buns, and pretty headbands


No comments:
Post a Comment